Thermal imaging technology has revolutionized firefighting, enhancing visibility, safety, and tactical decision-making. Selecting the right thermal imagers for your department requires a structured, data-driven approach to help ensure the devices meet your operational demands while maximizing value. This guide provides actionable steps, real-world examples, and visual aids to evaluate thermal imagers effectively, combining technical insights with practical testing methods.
Step 1: Define Your Objectives and Use Cases
Understanding your department’s needs is the foundation for selecting the right thermal imagers.
Key Questions to Ask
- What structures are most common in your area? Residential, commercial, wildland, or a combination?
- What are the primary applications? Locating hotspots, assessing fire spread, or visualizing heat signatures in zero visibility?
- How many imagers are needed? Determine the number required for efficient and effective operations on scene.
Pro Tip
Match features to use cases. For instance, departments needing detailed scene understanding during complex fires should prioritize resolution and thermal sensitivity.

Step 2: Develop a Specification Checklist
Before exploring brands or models, create a checklist tailored to your department’s needs.
| Feature | Recommendation | Why It Matters |
| Resolution | Minimum 320 x 240; 640 x 480 for complex scenes | Helps ensure detailed images for better decision-making in challenging environments. |
| Ease of Use | Intuitive controls, operable with gloves | Simplifies operation in high-stress scenarios. |
| Field of View (FOV) | Wide FOV for large spaces; narrow for detailed views | Adapts to your department’s most common operational needs. |
| Durability | IP67 ratings; drop-tested models | Withstands heat, water, and impacts typical of fireground conditions. |
| Thermal Sensitivity | NETD <50 mK | Detects subtle temperature changes for locating hidden hotspots or victims. |
| Battery Life | Minimum 4–6 hours; quick-swap options or long life battery | Helps ensure readiness for prolonged operations without frequent recharging. |
| Temperature Range | Matches your operational needs, especially for high-temperature environments | Prevents performance degradation during extreme heat exposure. |
| Additional Features | Image storage, on-screen playback, hotspot isolation | Extends usability and enhances operational capabilities. |

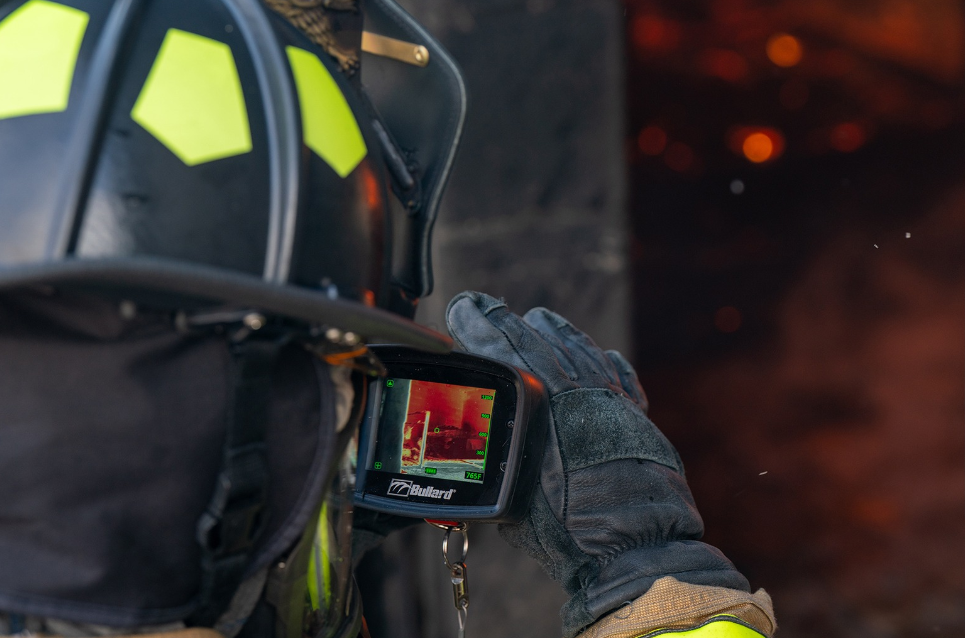
Step 3: Conduct Boardroom Evaluations
Before live-fire testing, conduct preliminary evaluations in a controlled environment to narrow your options.
What to Assess
- Ergonomics
- Test weight, grip, and size for comfort during extended use, especially with gloves.
- Viewing Angle and Contrast
- Check display clarity from different angles and helps ensure heat signatures are highlighted without losing detail.
- Battery Management
- Assess ease of recharging or swapping batteries. Devices should offer simple, efficient battery handling.
- Custom Settings
- Experiment with features like color palettes and sensitivity modes to evaluate usability and functionality.
Pro Tip
Include personnel from different roles during evaluations, such as firefighters, officers, and apparatus operators, to gather diverse feedback.

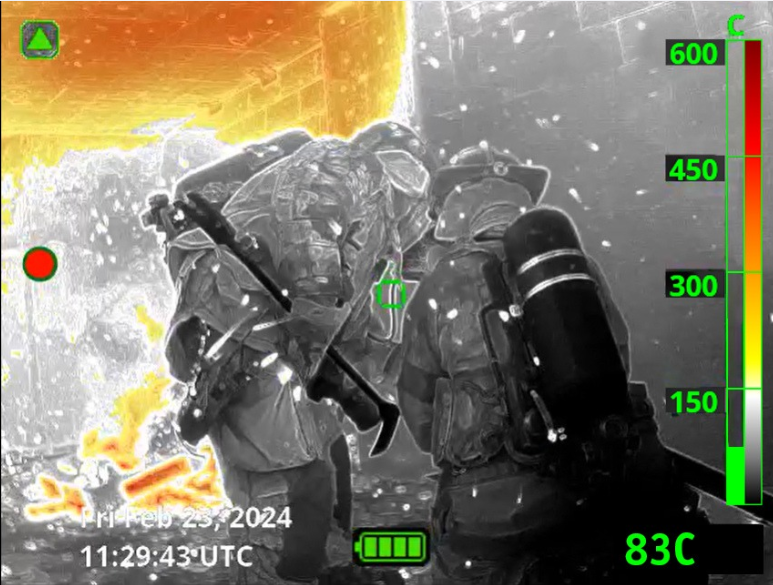
Step 4: Perform Live-Burn Testing
Live-burn evaluations provide the most accurate assessment of how thermal imagers perform under real-world conditions.
What to Test
| Aspect | Why It’s Important | Testing Tip |
| Image Clarity in Smoke/Heat | Helps ensure visibility in low-visibility conditions. | Simulate conditions with heavy smoke and assess the imager’s ability to render clear visuals. |
| Colorization Effectiveness | Highlights critical heat zones for situational awareness. | Evaluate the effectiveness of transparent overlays at identifying high temperature areas in a fire scene. |
| Thermal Sensitivity | Detects subtle temperature changes, essential for locating victims and hidden fires. | Evaluate devices by identifying faint heat trails or details in areas with smaller heat difference. |
| Durability Under Heat | Verifies device reliability during prolonged exposure to extreme temperatures. | Expose the imager to sustained heat and assess for fogging, overheating, or operational delays. |
| Battery Longevity | Confirms that battery life meets operational needs. | Track battery performance during extended operations and note recharging time. |

Step 5: Gather Feedback from Field Testers
After live-burn testing, collect standardized feedback from participants to refine your evaluation.
Questions to Ask
- Was the device comfortable and intuitive to use?
- Did the image quality meet expectations in challenging conditions?
- How did the device perform in terms of durability and battery life?
Pro Tip
Create a feedback form or use this template to highlight key criteria, such as comfort, ease of use, image clarity, and durability, to streamline data collection.

Step 6: Review Data and Finalize Your Choice
Combine insights from specification checklists, boardroom evaluations, and live-burn testing to make an informed decision.
Considerations
- Rank Devices: Use a scoring system based on technical specs and field test results.
- Total Cost of Ownership Analysis: Factor in costs for training, maintenance, and upgrades to understand long-term value.

Best Practices for Ongoing Training and Evaluation
- Routine Training
- Conduct regular sessions to help ensure users remain proficient with the device. Click here for a video on scenarios to use for in-house training.
- Periodic Testing
- Reevaluate imagers periodically to confirm they meet evolving needs.
- Feedback Loops
- After incidents, gather input on device performance to identify potential improvements or upgrades.

Conclusion
Selecting the right thermal imaging technology requires a thorough and structured evaluation process. By defining your objectives, conducting both controlled and live testing, and gathering detailed feedback, you can help ensure your chosen device meets your department’s unique operational needs.
For more insights or to explore Bullard’s thermal imaging solutions, visit www.bullard.com Equip your team with tools designed to enhance safety, efficiency, and decision-making on the fireground.